Hello, fellow tie dyer! If you are looking for how to do your craft,
well here you go! This tutorial and info base is meant for newbies, as
well as anyone who is seasoned...good luck to you!
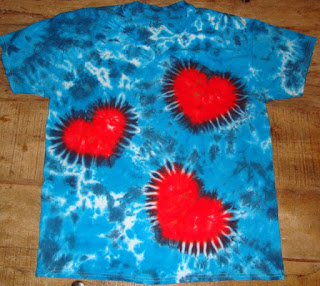 |
| Multi-Hearts, for the advanced tie dyer, and one of my favorites! |
About us:
We learned to
do tie dye out of a desire to...learn how to do tie dye. It was on my list, but when I tried it and then convinced Mike to join in...we kept getting it "wrong". We did it with
our own family, and extended family. Once we "got it right", the kids
proudly wore their creations everywhere. From that, folks started
asking them where they got their shirts from, and all signs pointed back
to us. In turn, we started getting asked, can you show us, can you
help us do a class, will you come do it in my classroom, etc. Since
2009, we have dyed or helped others dye over 5,000 shirts or other
items.
The Southern Maryland King && Queen of Tie Dye:
Yes,
we claim these titles, and it's just for fun! Yes, we know the awesome
Ron Lord, as well as some other locals who are very good at tie dye!
We love and respect their work, and our well-earned titles are no
reflection on them, or meant as any slight, in any way!
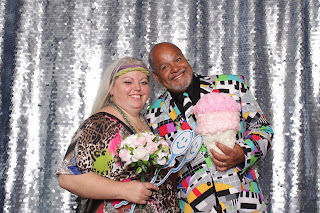 |
| The Southern Maryland Queen & King of Tie Dye -- and Photo Booths! |
For our main business, we now run a premier, social photo booth company,
Southern Maryland Entertainment -- Photo Booth Rentals.
We
are proud of the high standard photo booth business we have created and
we would love to see you there sometime! For anyone wondering, there
are many flavors of photo booths that you may see in your lifetime. We
are the Cadillac version of the photo booth, and worth every penny and
second! Come check us out, see for yourselves!
We chose "Entertainment" so we could put other things we like to do, such as Tie Dye, Sea Glass Art, Parties, and more, under our Entertainment Umbrella. But, back to Tie Dye!
The Supplies - The Dyes:
Keep it simple, buy the
BEST DYES!
Go to Dharma Trading.com and from this link choose the types of dyes you want. For most tie dyeing, you will go to the link for Dyes for Tie-Dyeing, and then get busy trying to narrow down your choices! It is a problem, to try to only pick a few.
Yes,
we originally did the typical and bought the kits from the local stores, such as
JoAnn's, Michael's, WalMart. Don't event bother, those kits are CRAP!
The dyes are not good, they do not produce as much as the packages
indicate, and the colors fade or wash out! Trust us on this one, and don't even waste your time on the store kits. You will NOT like your results if you do buy the kits! THAT we can promise you.
This is what you need to start with, if you want to keep your costs low, but want to get busy dyeing:
Go with the basic, primary colors. In tie dyeing, it will be:
1. #13 -- Fuschia Red (which is a hot pink)
2. #1 -- Lemon Yellow
3. #25 -- Turquoise
You can mix these colors and get the secondary colors, and even your tertiary colors, and then some! We used to do this, but found that we couldn't shake the bottles of dye hard enough to prevent a blue edging on the shirts from the mixed color for purple, or the red tinge for the color orange, and so on. Now we buy each color to use "as is" and then mix colors for fun if we want different shades or tones, etc. For example, it is fun to lighten some of the blue colors, if you want an end result of 4 blues on a shirt but only have 2 colors of dye.
The Process of Getting Started -- All the Supplies
Here is a list of what we use, of what we found to work best, to do all of the tie dye that we like to do. We like to do tie dye with groups, so this list reflects that setup. You may find you work better with a different setup. See pictures below for more info on some of the items.
- Dharma Fiber Reactive Procion Dyes
- Dust Masks -- when mixing dyes, ALWAYS use a dust mask, and do it in a well-ventilated area!!!
- Measuring spoons or cups. We use tsp and 1/8 and 1/4 and 1 cup sizes the most.
- "Just Orange" (or other flavors) juice bottles, or other sized bottles that work for you. We mix a half gallon of almost each color of dye each time we do tye dye, and two of the more commonly used colors, such as yellow and turquoise.
- Hair dressing bottles for applying the dyes to your shirts (we will use "shirts" from here forward, but meaning ANY item you want to tie dye)
- Plumbers tape, to wrap around the threads of the hair dressing bottles
- #16 and #19 rubber bands, but you can use any size, these work best
- Cotton string, for tying (we only use a little, mostly use rubber bands)
- Packing paper, to wrap your shirts in once they are colored
- Recycled grocery bags, to haul your paper-wrapped shirts home
- If doing shirts at home, we use a piece of chicken wire on top of a scrap piece of wood on the ends, put the shirts on top of that, and cover with a tarp or cut up contractor sized plastic bags -- saves on the paper for wrapping
- Plastic wrap, for those intricate designs that need the extra support
- WASHABLE magic markers -- for making designs
- Disposable gloves! pick your sizes, you will need a lot
- Kitchen gloves -- if you are doing the tie dyeing by yourself, I prefer to get sturdier gloves and re-wash them until they fall apart on me
- Dedicated long sleeve kitchen gloves, for squeezing out the shirts from the pre-soaking
- pHup -- technically, it is Sodium Carbonate, you can get this from the pool section in Walmart or elsewhere, when it is in season. Go to a jacuzzi store if you are out of season.
- Urea -- fertilizer you can get from Dharma Trading, or you can find at a local Southern States type store. Be prepared to give them your ID and explain why you are buying it. We get a large bag and it lasts us a long time, well over a year. If you only do a little, then buy from Dharma
- 5 gallon bucket to mix water and the PhUp powder
- Long whisk or a plastic spoon, for mixing the PhUp powder in the bucket of warm water
- Dish pan(s)
- Racks to put your shirt on, over the dish pan. 2 racks per dishpan
- Larger bin that fits the racks in, for washing between shirts, in soapy water
- Plastic or glass top table to do your tying on -- don't use wood for tying! -- this is the COLOR FREE ZONE TABLE!
- Plastic table to do your coloring on
- Chairs to use while folding shirts
- Cooler to store leftover mixed dyes in -- they last up to 2 weeks if kept cool
- Or a refrigerator with no food in it, for the leftover mixed dyes.
- Permanent marker, to label bags with names, if there is more than one of you. The bags all look the same in the end.
- HAND LOTION -- we prefer Cetafil. The pHup will dry out your hands, the lotion keeps them happier. We use it the entire time we are tying shirts.
- Detergent to wash your shirt when it is ready. We recommend using Synthrapol detergent, available from Dharma, but regular detergent will also work. Synthrapol is an industrial grade, and best to use if you are doing a lot of tie dye, and is what we use.
- Music to play while working/playing
- Bug spray, if you are working outside
- Tarp, if you are brave enough to work inside of your your house, or in a garage, etc.
- Paper towels, or an old towel, for cleanup purposes
- Large trash bag for keeping your area clean.
Urea is used in tie dyeing and other forms of direct application of dyes. ... Urea has two purposes: it can
make it possible to dissolve more dye in a given volume, for the
strongest of colors, and it serves as a humectant, or water-attractor,
to help keep fabric damp long enough for the reaction to occur. (www.pburch.net/dyeing/FAQ/urea.shtml)
How to wash out the dye in tie dye:
after letting the
shirts sit in bags overnight (at least 70 degrees or higher) (pref closer to 24
hrs, at this temperature), they can be washed out
if you have a top
loading machine, you can pre-fill the washing machine full and just drop in the
t-shirt (out of the bag, of course, AND after removing the rubber bands or
strings) and run through a regular or light cycle, OR you can do the following: (Note:
you can wash up to 10 shirts at one time, but if you do this, you should
also wash them out before putting in the washing machine):
wear protective
gloves (or, if you don't have gloves, improvise with plastic wrap or a small grocery bag, anything to protect your hands from the color)
can wash in the
kitchen sink, just try not to splash the dye
can also wash
outside with a garden hose and bucket, and let the dye water wash away, it
won't hurt the grass or driveway
take out of the bag,
run under water that is initially cold to cool, until it runs clearer; it will
be VERY dark at first, even if there are lighter colors in the shirt
take out of the
rubber bands or strings.
keep under running
water and squeezing, or you can use a bucket and try dipping and squeezing,
with the water running in the bucket the while time, you can also add a couple
drops of dish or laundry detergent to the water towards the end, to help with the rinsing
once it runs
clearer, put aside where it won't touch
any other dyed shirts (lay out on the grass). Do not hang up to drip dry,
the colors are still active and will run downwards.
if you have a top
loader, pre-fill washer with warm water -- run through light wash and rinse
cycle
immediately after washing,
dry in a hot dryer – the dryer heat is REQUIRED to finish the dying process
The next wash "might" bleed a
little bit, but won't bleed after that. (UV rays will fade the colors over time).
THIS IS NOT COMPLETE YET, working on it! Come back soon for all the goodness of tie dyeing!


