Wednesday, February 23, 2011

Puzzle Quilt, Version 2

Well, I couldn't wait, so I went to the fabric store this afternoon, in the only 30-minute window I had all day. I was looking for a few greens, oranges, yellows, and maybe a red or two. Here is the revised version of Chris' Puzzle Quilt. We like it! It has 667 squares that will have a finished surface of 3" square. All of the squares are cut out, except for 57 of the border blues. They will be cut out before the weekend, so we can start the assembly process, woo hoo! These are photographs of the actual fabrics we'll be using. The "differences" will be in the additional squares not represented here, where there are more variations in the fabric prints. It will look even more unique and fun once they are all assembled.

Did I mention this is one of my mental therapies. Apparently I need a lot of therapy these days... For sure, it's making me a lot more patient and nice to others, so that is a good thing.

Monday, February 21, 2011

Christopher's Quilt...In Progress!

Many of the 3 1/2" squares have been cut out, and here is the first run for trying to figure out the color configuration. I think I have to go and get a few more red/orange/yellows to blend in, so it's not quite so blue. Might change the border from blue to another flavor, not sure about that yet. But in all...I LIKE it, and Christopher is starting to get excited about getting a bigger blanket for his bed that he can call his very own again. Needless to say, he's outgrown his baby quilts!


This configuration was created by photographing the squares, reducing the sizes of the photo files, and copy and pasting into an excel spreadsheet. The spreadsheet was modified so the individual cells were made to be square, thereby fitting in the colored squares. Many of the prints are more varied than represented here, because there are many other designs on the prints. Here, it looks like exact duplicates for the various colors. The final product will be much more interesting, coming in at approximately 69" x 87".

Estimated hours to completion: who the heck knows! It took about 8 hours to dig through the fabrics and to cut out all the squares.

Sunday, February 13, 2011

WV Buddies, Harpers Ferry, WV


Looking for WV Buddies of Harpers Ferry, WV?

To learn about his available rescue dogs and puppies, you can find him on petfinder.
For more stories, you can go to Dean's blog page.

For my comments and some of his awesome pictures, look below:

What can I say about Dean of WV Buddies? He is truly the Dog Whisperer of WV! I have personally seen him working with these dogs, been fortunate to spend days at a time in his rescue and if you want the truth and you want a good rescue pet, you can't go wrong by checking in with Dean. He genuinely cares from the bottom of his heart, and it shows. From the pictures below, it may seem that he has a lot of puppies, and he does, from time to time. The local shelters are not equipped to handle litters of puppies, so they rely on the fosters and other rescues to come to their aid. Make no mistake, the puppies are a LOT of work, but so cute and cuddly! I love when he has a mixture of new puppies and also the adult dogs, they are a good balance of energy and responsibilities. Dean takes in the new ones, old ones, sick and odd ones. Each has a special forever home, and he does an excellent job of finding just the right matches for each one. See some of the pictures below for some of his "babies". All pictures are by and of WV Buddies.

News update: Check out the Vintage Lady, also in Harpers Ferry, WV
She has an awesome store of all sorts of neat finds (I especially like her eclectic collection of greeting cards), and now she is hosting a donation for some of her sales towards WV Buddies rescue fund. "What better time to start a “give back” program than Valentines Day…..and who better to be the first recipient of this new program than WV Buddies and founder Greg Dean...."

* * * * *
Jake and Elwood, with some of their little friends, lounging on the couch
Ares
Chris and Ares, one of Millie's pups
Ares & brother Atlas
Atlas always liked to lay in the water or food bowls, whenever he could
Annie and her new pups, including Jake & Elwood
such a good mommy

Katie
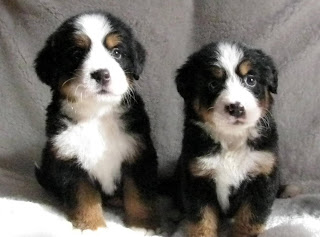
Just washed and fluffy Bernese Pups
Doc and Roux
Min-Pin-Pom Pups!
Maggie's 10 Inauguration Pups
Lucy
Esther
Winston
The Crew
Queenie's Pups
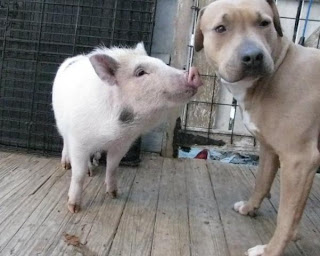
Annie and her new friend, The Pig
Niles
Minnie and her 3 pups, plus one loaner
Kallie and her 9 pups, just born on February 11th
Erin, geriatric mother of the Bernese Pups
Cookie
Erin's pups: the Bernese slippers
Annie sunning with a friend

I lose count...there have been SO MANY dogs that have come through Dean's fosters and now his rescue operation. That we could all care for dogs as much as he does, there would never be an unwanted pup in the world...

Creative Therapy

Writing gives me much pleasure, it's a creative outlet unlike any other. If I were a better painter...

Alas, I'll stick to writing and beading and sewing and quilting and playing with the kids and music, and so on. The past several of years have presented many changes for Mike and I, and Christopher by extension, and I'm glad that we have survived. In many respects and on many levels, we are much stronger and wiser for the experiences and opportunities. Being able to write and do other creative projects has been one of the secrets to keeping our sanity and being strong enough to "keep it together" even on the days when we were not so sure about things.

I want to apologize to everyone that we were in touch with, or not, for any lapses in judgment or behaviors, or for any neglect or any other negative experience we may have shared or bestowed upon you. Sometimes folks act in odd ways and reactions are not always anticipated or appreciated. I'm sure we are guilty of plenty of the above, and for that I apologize.

Life goes on, and we learn. I feel I'm finally back on the right spiritual track for me, which is really the most important part of who I am. My grounded spirituality helps me be a better mom, wife and person, which makes all things possible, all that is important to us.

And so, the bursts of creativity have finally found some action instead of no-action, some closure and completion, vs. "unfinished projects" just lingering around. Just like your dendrites create more and more pathways the more you learn, making it possible to learn even more in a shorter time (more efficient), creativity works the same! More begets more!

So, thank you, Melissa's quilt, and so, Melissa and Holly. Thanks for the incentive to finish (albeit a bit late, due to the circumstances) the massive quilt, and for the resulting creative energy to move along to all other promised projects and newly inspired projects!

Thank you, life, for the challenges and finally, for relief, wisdom and inspiration.

While there are plenty of "known challenges" ahead, combined with the ever-coming unknown ones, we are no longer apprehensive about any of them, we do not live in fear of the unknown, we embrace the changes that come our way.

And now...time for bed!

Christopher's Quilt: Puzzle Pieces

Next up: puzzle quilt for Christopher! I figured out how many "pieces" he'll have and it looks like it'll be 63 total "unique" pieces. Each one will be made of a different color and print, so it will be interesting to see how it finally comes out. Needless to say, he's outgrown the baby quilts that once covered his entire body. At 4 and a half feet tall already, we're just going to jump ahead and make him a full-sized quilt that he can use for a long time. This one will be 63" x 81", or close to that, since each of the squares will be 3" wide. Of course, this is a colored pencil rendering, it will only resemble the final by the pattern. Can't wait to start, especially since Chris gets to go to the store with me to pick out some of the fabrics that will go into his quilt! He's pretty excited also, and says he likes the pattern. Yay!


Ann's Quilt: Card Tricks

Now that Melissa's quilt is done, I have time to work on a new quilt, one for our beautiful cousin, Ann Nutting. I make the top, add the binding, and she does all the hand quilting and finishing of the binding. The best part: she gets to keep the finished quilt! We have collaborated on several quilts now, and it's a lot of fun to work this way.

I've been promising her this one for 2 years, it's almost ready for mailing! This is the top, and tomorrow I'll put the backing, batting and binding on. The inner blocks are called "Card Tricks" and are about 12" x 12", so the final size is just over 5 feet on each side, making a nice lap quilt that should be plenty warm and toasty. It looks a lot nicer in person, the colors in this picture are not really "on" the red is really a deeper red, the outer border is almost a navy blue, of black and blue swirls. Look closely and you'll see all the rainbow colors!


The photo was taken as hanging on the clothesline by basting pins, blowing gently in the wind after we had an overnight dusting of 1/2 inch of snow. Very nice and pretty morning!


Saturday, February 12, 2011

The Making of a T-Shirt Quilt

In December 2008, I was asked by my dear friend, Holly, to make a t-shirt quilt for her daughter, Melissa, for her high school graduation in May 2009. I consider Melissa as a niece, fortunate to know her since she was 4 yrs old, and was more than happy to take on this project. I did not think ahead to photograph all of the various stages of this project, but here are the pictures that did get taken along the way. It took me almost 2 years to complete the quilt, due to many delays along the way, but it's finally done, and was delivered tonight by Holly to Melissa in her college dorm. Can't wait to get that picture to add to this photo essay! I hope she loves it as much as I enjoyed making it.

Just a few words about the following. First, this was a long-distance collaboration between Holly and I. She sent the t-shirts, I researched the process. I photographed the t-shirts individually and put them on an excel worksheet, where each "square" in excel equaled an inch of the quilt. Then, Holly and I found some really pretty material for the two border fabrics, as well as the yellow flannel for the backing. By copying the fabric colors into the excel worksheet, we were able to see a picture of the quilt before any t-shirt was ever cut or a stitch sewn. This was a first for me, and I found it quite fun. Once we had the picture of the quilt, Holly was tasked with figuring out the order of the t-shirts, in how she wanted them to show up on the actual quilt. Here is what we both came up with, for the working template. All the other pictures are as the quilt progressed, all the way to where we finally had it all folded up and ready for shipping, and with Christopher helping load it up in the car.

For anyone wanting to make a t-shirt quilt, I say it was a lot easier than I had expected, and it came out so nice. The t-shirt fabric was held in place with a stabilizer material, and the flannel never puckered on the back...making a really nice final project. I'm really excited that it is finally done, after many, many hours in the making. I especially want to thank my husband and son for their patience during the making of Melissa's quilt, and Holly & Melissa's patience with the many delays that made this take 2 years.

Enjoy! We did!

template made in Excel to figure out placement and colors
once the blocks were pieced together and the top was done, I pin-basted
the top, batting and backing on the floor of a classroom at the local high school


using a conference room at the public library for 4 hours, I was able to use a quilting ruler and different colors of quilting chalk to make the markings for machine quilting

it took awhile to figure out how to do the machine quilting, but once the markings were done, the rest was easier than originally thought. I started with each of the corners and worked my way to the center.
while this part of the backing looks a little puckered, once the rest of the quilting was done in the opposite direction, it laid flatter and looked much nicer
using our friend's table upstairs to do some of the machine quilting, I had LOTS of helpers to keep me company. here is Herman, he liked to just hang out on the outer edges of the quilt

Cassie, on the other hand, liked to lay a lot closer to where I was sitting. she didn't appreciate it when she got too close to the machine and had to move over, giving me the occasional grumpy meow to make sure I knew how she felt
they felt no need to move off the quilt, pretty much staying on top at every opportunity

even Trinity, Marti's shepherd mix (under the table) was excellent company


at this point, all that was left to do was to trim the edges, cut any loose threads, and add the binding

every special quilt deserves a special label

Melissa's school was quite competitive and were able to march in the Rose Bowl Parade. in addition to their t-shirt, they got stick-on roses. I secured her rose to one of the corner blocks.
finally done!!! folded up, complete with the duplicate t-shirts we returned to Melissa, ready to mail

the final product, held up by Mike and my cousin Tina. it ended up being a king-sized quilt, where it hangs over the bed on both sides and a little on the end. a little on the larger side, but I think it worked out okay that way.

Christopher helping me load the quilt into the car so we could mail it. it went UPS and weighed in at 13.5 lbs, including the 6 duplicate t-shirts that we returned.
next: Holly delivered it to Melissa in college on February 12th! can't wait to see pics!

all the sewing on this quilt was done on a 1964 Singer Touch and Go sewing machine

Christmas Ornaments for Charter School Auction

In November, my cousin Tina asked if I'd make a couple of ornaments for the winter fund-raising auction at the charter school where her girls attend. I said "sure!" Then, came the holidays and I didn't get them done until the end of January. Actually, the one on the right was done in September, and I entered it in the St. Mary's County Fair, where it won 2nd place, and 1st place in the Calvert County Fair. I liked the colors, even though it did have a mistake in it. It was too late to fix the mistake, and most wouldn't notice it unless they look closely.

The one on the left is the same pattern, but with different colors and different beads. As you can see from the second photo, the bead pattens are circular. When finished, they are draped over a glass Christmas ornament of your choice. The beauty of it is, if the ball were to break, then you just put it onto another ball. It's virtually timeless and should last a long time.

This creative outlet is portable, where I can take it with me to work on when I have blocks of free time away from home. It is one of my favorite hobbies, since the glass beads are therapeutic in their touch, and in how they are so beautiful as they take shape into projects.


I love working with glass beads!
I wonder how much they gained for the school through the auction.